skip to main |
skip to sidebar
 This weekend, I hauled out my outdoor holiday lights. However, the rainy weather kept me from making the effort to string lights on my house, and I opted for the easy way out. I pulled out my large glass candle hurricane vases, loaded a strand of lights in each, plugged them in, put a decorative wrapping paper collar on each vase, and placed them on my front porch. It is pretty simple looking, but I think it still shows some seasonal spirit.
As for my indoor decorating, I am usually fairly minimal, but I did decide to put up my fake white tree this year. I wanted to put the tree in some type of urn-like container to elevate it, so I looked around my garage for something I could use. I found this old plastic trash can behind the garage. Tyler uses it to haul yard clippings around, so although it looked bad, it never really held any gross trash. I used industrial clippers and cut the handles off the can. (sorry Tyler)
 Next, I decided that I would pad the can to give it less of a trash can loo
 k, and more of an upholstered furniture look. I planned to use quilt batting, but was out, so I used this silvery bubble wrap that I found in the garage (no idea why we have this material). I used my hot glue gun for this entire project, and after I finished hot gluing the bubble wrap around the can, I began hot gluing my striped fabric on the inside lip of the can, and stretching it over the bubble material and gluing on the bottom of the can.
 Once finished upholstering the can, I stacked boxes and scrap wood inside the can, placed my tree at the height I wanted it, and then hid the messy inside of the can with some purple velvet. I thought the can looked a little plain, so I decided to give it a button trim, sort of like a tufted effect. I stitched red X's in the button holes for color, and then hot glued the buttons on. While I did succeed at disguising the can, I think it is a tiny bit big for the tree, which I think draws attention to the fact that it is a trash can. Oh well.....its up!
After spending about 2 hours crafting the upholstered can, I was out of time for actually decorating the tree, so to quickly finish my decorating, I opted to hang my pet's stockings on the tree. They are oversized, but balance the giant base a bit. I also had some cardboard gift tag letters so I added our initials to the tree as ornaments. Our tree definitely has an artsy, craft project look this year, but it is really the glow of the tree at night, not the tree decor that does it for me!

Driving through a client's neighborhood recently, I spotted this amazing exterior transformation. All the houses on the street appear to be circa 1960's, and here is a "before" example.....one that looks to be in its original state. A few houses down is this updated elevation transformation, of a house that must have been identical to the "before." I'm impressed. I really like it when people redo old things.
The winner of my final holiday pillow cover giveaway is.......Robert Fontenot.....congrats! Email your address to christie.chase@gmail.com and your pillow cover will be on it's way to you! On a side note, if any of you want holiday pillows made from that same Marimekko red table cloth, I have enough fabric to make a few more. $12 for zippered closure pillow cover without insert (including shipping)....$25 with insert (including shipping)...email me if you are interested.
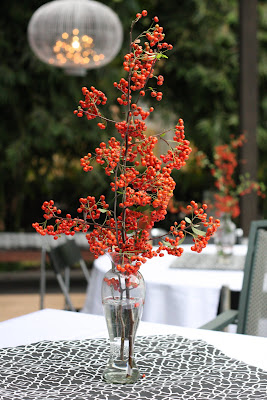
 Above are photos of my Thanksgiving centerpieces that I quickly put together the morning of. We had a turkey fry to celebrate the holiday, and I set up tables on my deck for family and friends to eat, drink and chat. Taking a cue from my friend Vanessa of OneHauteKid's post on gathering flowers from your yard for arrangement, I quickly cut some berries off of a thorny pyracantha bush that is taking over my side yard. (The berries look much prettier in the vases than they actually do on the out of control bush.) I used clear glass vases for several of the tables, and did a small arrangement in a glass that had red botanical silhouettes on it that was a candle gift from Anthropologie a few years back that I just could not part with once the candle was gone.

 I am helping my client Sara redecorate her home office/guest room/treadmill room, and I made this window pelmet for her window courteous of these instructions over at Little Green Notebook. The directions are really great, and super easy. I had to modify slightly by adding an extra hook or two on the back of it because this pelmet spans an 80" window. I wanted to create something sculptural and artistic for her so I simply cut circles out of various linens and layered them on the pelmet, attaching with a drop of hot glue. To give it a bit of shine I also added circular mother of pearl shell chips that I had ordered online for a centerpiece project I did years ago. We are finishing up this room in the next week or so, and I will be sharing several other unique, easy projects that I made for this room!
Nine names in the hat this week for the third holiday pillow giveaway, and it's your lucky day jenlbez.....congrats! Send your address to christie.chase@gmail.com and your pillow cover will be on its way to you! 
 The final pillow cover up for grabs in my holiday pillow cover giveaway series is made from a former Marimekko table cloth, and an upholstery green/white ticking fabric. The pillow cover fits a 16x16 inch pillow form (not included in the giveaway) and has a bottom zipper closure. Shipping to U.S. destinations is included. To throw your name in the hat to win this pillow cover simply leave a comment on this post. I will draw and announce the winner next Wednesday. Have a safe and happy Thanksgiving!
 My friend Sarah picked up an old window at a flea market for $5 this past summer. She commissioned me to paint a botanical scene on the window for her bedroom. I used a wax pencil to draw my design onto the window, and then applied artist's acrylic paints directly to the glass. I finished it with a matte varnish, which gave the clear glass a frosted finish and will help protect the painting.
 I have a really tall, narrow linen closet in my house, and I am constantly dragging a dining room chair into the hallway to access the upper shelves. Tired of constantly moving the chair back and forth, I decided to find a stool solution that I could store in the hallway near the linen closet for easy access. As closet space is scarce here, the stool has to stay out in plain view, so I wanted it to be somewhat stylish. I found an old folding stool in my garage that I got about 10 years ago. It was a bit rusty and the top vinyl was gross, so I gave it a little facelift to make it worthy of being indoors.
Pictured to the right is a "before" of sorts that I pulled from Walmart.com. While my stool was not pink Hannah Montana, you get the idea that it was not attractive.
 This is my stool after it's facelift. I simply spray painted it black with a Rustoleum Metal spray paint, and recovered the top with a scrap of black & white fabric and a layer of clear vinyl for durability. The stool folds, and now fits nicely in an exposed cubbie next to my linen closet, and is making it much easier and pleasant to access the the closet.

 This weekend, I hauled out my outdoor holiday lights. However, the rainy weather kept me from making the effort to string lights on my house, and I opted for the easy way out. I pulled out my large glass candle hurricane vases, loaded a strand of lights in each, plugged them in, put a decorative wrapping paper collar on each vase, and placed them on my front porch. It is pretty simple looking, but I think it still shows some seasonal spirit.
 Next, I decided that I would pad the can to give it less of a trash can loo
 k, and more of an upholstered furniture look. I planned to use quilt batting, but was out, so I used this silvery bubble wrap that I found in the garage (no idea why we have this material). I used my hot glue gun for this entire project, and after I finished hot gluing the bubble wrap around the can, I began hot gluing my striped fabric on the inside lip of the can, and stretching it over the bubble material and gluing on the bottom of the can.
 Once finished upholstering the can, I stacked boxes and scrap wood inside the can, placed my tree at the height I wanted it, and then hid the messy inside of the can with some purple velvet. I thought the can looked a little plain, so I decided to give it a button trim, sort of like a tufted effect. I stitched red X's in the button holes for color, and then hot glued the buttons on. While I did succeed at disguising the can, I think it is a tiny bit big for the tree, which I think draws attention to the fact that it is a trash can. Oh well.....its up!




 Posts


