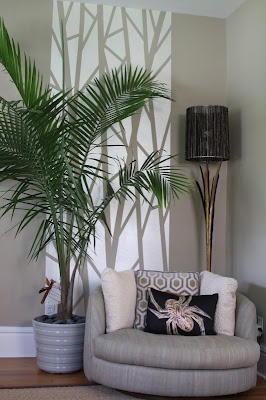
This room needed the least amount of work of all of our rooms. Initially we tiled over the brick fireplace, removed the drapes covering the original leaded glass windows, did some sheetrock repair, installed recessed lighting, and had the original 1919 pine floors refinished (hiding under the rug in the above shots). Here is how I had the room decorated in 2008 when it was featured as a sneak peek on design*sponge.
.....and here is the room's latest makeover ......
The makeover started with this chevron rug by Nate Berkus for HSN that I bought to replace the neutral colored sisal I had in the room. My pets had ruined the sisal, and I decided to go with a bold pattern this time. The other changes to the room entail some thrift store finds, new artwork, pillows and some furniture rearrangement.


wow! i love it!
ReplyDeleteThe tree branches/canes?? effect on the wall in the 3rd picture,just behind the fern and chair, is stunning. Did you paint it on with a stencil .. is it wallpaper? I would love to know how it was done. Can you share your sources? Many thanks.
ReplyDeleteP.S. Love your blog!
Hi,
ReplyDeleteI painted the tree branches on the wall in my front room using blue painter's tape. I talked about how I did it in this post. Hope you find it helpful!
http://christiechase.blogspot.com/2009/10/85tools-i-cant-live-without.html
Thanks ever so much for the tip - I'm going to try my hand at it and hope that it turns out as least half as good as yours!
ReplyDeleteyour new room looks great! I *heart* it....
ReplyDeletejen
http://blankwhiteframes.blogspot.com
so cool how you can transform the same space into two different, awesome looks. can't wait to see where it goes from here!
ReplyDelete