Thursday, April 30, 2009

#12.......baby L's nursery

This past week, I spent decorating my cousin's nursery in Jersey City. She and her husband live in a railroad apartment where all of the rooms are stacked in a line from front to back of the apartment. The right side of each room serves as a hallway, as the doors to the adjoining rooms are lined up down that side of the apartment. They are renters, but were allowed to paint. We chose Hale Navy by Benjamin Moore for the accent wall, and white for the other walls, to help draw your eye to the side of the room that is home to the crib and changing table. My cousin really wanted to limit things on the floor, so we opted for Elfa shelving from the Container Store to give storage. In lieu of purchasing the pre-made shelves with the Elfa system, we decided to have wood cut at the local Home Depot, and I painted it to match the changing table, which was also painted as it had been in my aunt and uncle's attic since my cousin was a baby. I made a curtain to partition off the grown-up room out of a Jonathan Adler duvet cover, and a Roman shade out of an Amy Butler print, to brighten up the color palette while functionally letting them control the light coming into the room.

This room was relatively easy to put together, and fairly inexpensive. My cousin had already purchased her crib, and I was thrifty in sourcing the fabrics, using remnants from previous projects for the baby quilt duvet, and bumper, Roman shade and bottom section of the partitioning curtain. The Elfa shelving cost was significantly reduced because we used our own shelves instead of those the Container Store sells. We were going for simple, modern, but cheerful, and I can't wait for baby to arrive and see his or her new room! Click here to see more pictures of Baby L's nursery on my Flickr Photostream.

Tuesday, April 21, 2009

#11...table transformation


This table has been in my brother-in-law Jesse's family for over 3 decades. His parents bought it in the 1970's from a family that had owned it for years, so I believe it dates back to the 1950's. It made its way to my sister Julie and Jesse's dining room, and as you can see in these before pics, it was in need of some love and attention.

While visiting this past week, Tyler and I took on the project of sanding and restaining the table. There were a few unexpected bumps in the project, but I think the end result breathed new life into the table and will service their dining room nicely for years to come.
I have refinished tables before, and thought that this project would be able to be finished in 12 hours or so, however, it ended up stretching over a few days, and I was putting the last coat of Wipe-on Poly on as we were walking out the door to the airport to head home.

The table was somewhat resistant to the new stain even once we had sanded it totally down, which was really baffling to me, until I learned that Jesse's father had refinished a few of the sections of the table in the 1970's using surf board resin that he had on hand. Because of the effect the surfboard resin had on the wood, the first few coats of MinWax stain soaked in very unevenly and would not dry in some spots. Despite that the can claimed it should dry in 4-6 hours, the stain was still very tacky after 20 hours with two fans blowing on it.


Originally, we were hoping to attain a dark uniform stain using the MinWax color Jacobean, but because the stain had trouble penetrating the sanded wood, we ended up with a more variegated, weathered look. We choose a flat black paint for the legs to give it the feel of an iron base. The project cost about $80 for stain, paint, poly, rags, brushes, rubber gloves and a hand sander. I did the staining and painting indoors, but we were careful to open doors and windows to air out the stain smells. In total, this project ended up taking about 15 hours of man power and 3 days of in between drying time.

I am headed to New York tomorrow to help my cousin outfit her nursery, so I am off to work on some artwork to hang above her crib. I'll be posting DIY efforts from her space next week.

Friday, April 17, 2009

#10....by the bay

Tyler and I are on the west coast this week visiting friends and celebrating our niece Audrey's 1st birthday. Last night, we got ambitious and decided to refinish my sister's hand-me-down dining table. I'll be posting the DIY effort on Monday, as it is still mid-stain, but I think it is going to be quite the transformation.

Monday, April 13, 2009

#9....bunnies, chocolate & crawfish

For Easter we hosted our second annual crawfish boil. The weather almost ruined it, but everything (including the crawfish) turned out great and about 15 people came for the feast. We boiled a total of 40 lbs. of crawfish, 4lbs. of sausage, and 20 lbs. of veggies, including; mushrooms, corn, potatotes, garlic, onions and lemon. This season, the crawfish were running $2.75 per lb., so the 40lb. sack of crawfish cost about $120 including the spices that get added to the boiling water. It takes about 3 hours to do the prep work for the boil, which includes cleaning the crawfish, cutting up all the veggies and sausage and boiling the water. The crawfish actually cook for less than 30 minutes once they make it into the pot. It is a messy meal, but if you have an outdoor space to do it, it is really fun!


Friday, April 10, 2009

#8....book sculptures


Book sculpture is a controversial subject it seems. While there are those against using even dime store copies as raw material for art endeavours, I personally think that turning a book into a sculpture is a sort of a tribute to the original written work.

My youngest sister Sarah is a graphic design student at the Art Institute, and last quarter was given the assignment to create a book sculpture. While graphic art is 2D in nature, designers still need to have good conceptualization of how to create 3D objects. She was inspired by the work of Nicholas Jones, an Austrailian designer, whose work is pictured above.

Sarah chose to create her book sculpture from the classic E.B. White story "Charlotte's Web."
While she bought close to 15 tattered copies from thrift shops, she ended up only using one copy to create her sculpture. As it turned out she had a hard time cutting up the books.

I am so thrilled to say that her sculpture is going to get to live at my house, and I'm planning to get a display box for it to keep it safe from the cat, who thinks that the paper spiders attached to it were made for him. Here is her web inspired sculpture.

Wednesday, April 8, 2009

#7...from bride to baby

This week I have been working on a quilting project that involved turning this scrap of bridal lace into a keepsake quilt for baby.
When I was first sent the lace for this project, which amounted to a narrow strip cut off from the hem of the mommy-to-be's wedding dress, I was perplexed about how little material there was, and how I was going to turn it into a quilt that showcased the lace.
With the help of my sister, we came up with a design to cut out the lace flowers and embroider them as a little garden centerpiece for the quilt. I do not do embroidery that often, and I really misjudged the time it takes, but I really like how the little garden turned out. I chose to border the garden with a patchwork pattern using several pink floral, dot and striped cottons. I added a monogram square with baby's initials on it, and since she arrived early, I embroidered her birthday on too!

Tuesday, April 7, 2009

#6...updated breakfast set

I have been helping my brother Mike update his 1979 ranch style home in San Antonio. He and his fiance Kelly are going to live in it for about two more years, so we are remodeling with the intent to attract buyers. This photo of the kitchen shows the kitchen cabinets that we recently repainted from their original outdated, dingy oak coloring.

For the breakfast area, a friend gifted us this 1970's breakfast set that was sitting unused in storage. I purchased about $25 of Rustoleum spray paint in "oregano" color, and spray painted the chairs and table base. For the chair cushions I used Dwell Studio for Target cloth napkins and trimmed the table cloth with the same fabric. It was an easy project and in total took about 3 hours to paint, reupholster the seat cushions and make the tablecloth.

Here is a before of the set.


and here it is after the makeover......

Monday, April 6, 2009

#5...deck do-over + over


I have a beautiful deck on the back of my house that virtually spans the entire back of our bungalow, and gives us so much outdoor living space. My husband built it with the help of my father and father-in-law. Also, we have an oversized wooden staircase leading to our over garage loft space. My only complaint about the wooden deck and staircase is the maintenance. I had no idea how much love and attention wood decking needs. The hot Texas sun is brutal on the stained lumber that the deck is made of, and every few months I have to re-stain the deck surface and stairs. It is a chore that I procrastinate on so badly that I usually find myself late the night before we are hosting a party, re-staining (all the while cursing the wood surface). It is not that it is hard to restain, I use about $60 worth of stain/sealer for the stairs and $60 for the deck, and I apply it with a roller on an extension poll that I simply roll back and forth, as if I was mopping or sweeping. It takes me about 2 hours stain the deck and 4 hours to stain the stairs. Here is a before (left) and after (right) of my most recent re-stain.


Lately I have been dreaming of decks made of materials other than wood. I am loving the idea of a large stained concrete tiles and some metal railings and staircase. I'm not sure how the industrial look of concrete and metal would blend with our historic home, but I like the idea of less maintenance!

Thursday, April 2, 2009

#4....shoot it, print it, hang it

I had the opportunity to visit London for the first time a few months ago, and while I took so many iconic London pictures while I was there....Buckingham, Westminster, Millennium Bridge.....this photo that I took of two guys hanging out at a heavily graffitied skate park along the Thames is my favorite shot from the trip.

Something about the bright colors makes me happy, and I remember the whole trip just looking at this photo. I decided it would be the perfect piece of artwork to hang on a large vaulted wall in my studio space. To accomplish this, I took the raw image to a local print shop that deals in a lot of large scale printing for billboards. They told me that I could blow my image up to 54" wide by 36" high and it would still be 99% in focus, which they assured me would look fine if hung up high. The image was mounted on 1/2" Gatorfoam and weighs less than 5 lbs. I had some trouble hanging it at first, as the shop did not put mounting brackets on the back. I tried a few methods with picture hanging wire, but ended up using industrial strength Velcro in two strips.

Here is a picture of it hanging in my studio. The printing and mounting cost me about $300 and the Velcro cost about $10. This DIY project took very little time, as all I did was take the photo and drive back and forth to the print shop. I think it turned out great and it is a pretty affordable option for large scale original artwork. You can see more of my studio space on Design*Sponge, or for more even more images look here.

Wednesday, April 1, 2009

#3...don't be a Fool

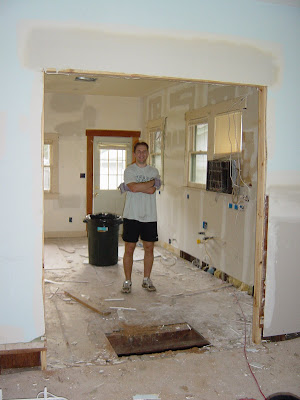
My kitchen 2009

Today is April Fool's Day, and boy did I see one on HGTV last night. On one of the renovation shows, a guy and his Mom were installing upper kitchen cabinets to the wall. The guy was skipping several key steps like measuring, shimming, leveling. What was totally insane was that he decided to forgo the wall anchor system that came with the cabinets, and simply put a few screws (sans anchors) in to hold up the cabinet. Within a few minutes, (as he is working in another corner of the kitchen,) the whole cabinet falls off the wall, breaking the door fronts and damaging the already installed lower cabinets. It was so hilarious to me, I played it back a few times, all the while telling the guy on TV what an idiot he was.......
Funny thing is, that it was not too long ago that Tyler (my husband) and I installed our own kitchen cabinets. While none came crashing to the ground, the project was plagued with problems, took us months to complete, and was a total pain.

When we ordered our brand new Kraftmaid cabinets we thought we were being so smart and money savvy by planning to install them ourselves. The salesman shook his head, and strongly urged us to have them professionally installed. We just smiled, knowing how much smarter we were than him.

The cabinets came in 18 boxes the size of a shipping pallet. Our kitchen is a galley style and not even really that big, so the size and amount of boxes that arrived was startling. We spent the first 3 or 4 weeks with our cabinets moving the giant boxes around trying to make pathways that we could squeeze through to get around the house. Sometime after week 6 we began installation. My Dad came to help, and we had grand illusions that we would finish in a weekend. At the end of two days only one bottom cabinet was in place. It was so much harder to level, shim and mount them than we expected.

Fast forward five years, and while the cabinets are all in, we still have yet to put the molding on the top of the cabinets. It would have cost us an extra $1500 to have them installed, which if I ever redo a kitchen again is going to be the first thing I pay for!


Summer 2003