Wednesday, June 30, 2010

#203...kitchen table & lighting progress

We made some progress on the kitchen this past week. We got a lighting fixture hung in the banquette corner and a table made too!
For the lighting, I found these vintage ceramic pendant shades in my attic. I bought them years ago for about $15 a piece. They were part of a lamp that featured an extension pole that fit from ceiling to floor that the pendants hung from.....very 1970's. Originally, I thought I wanted a glass fixture for the corner, but then I decided the pop of color would work. Plus, we already had the shades and simply purchased this $50 fixture from Lowe's,  and did a bit of surgery to it to get the shades on.
To make a table for the corner, we purchased a restaurant style stainless base from legsandbases.com. To make the table top we screwed together (from the bottom) two pieces of 1" birch plywood. We drew our kidney shape pattern onto the wood, using a paper pattern that we spent considerable time perfecting. Next, Tyler cut the double thick plywood shape out using a jig-saw.
I'm planning to stain the sides to match our pine flooring and white stain the top of the table, so that the grain still is visible.

Monday, June 28, 2010

#202...wine storage

For years, I have had a 40+ bottle wine refrigerator plugged in in my kitchen; however, we rarely have more than 5 bottles in it at any given time, as we pretty much drink all of the wine that we get. In planning my kitchen reno (you can see the old wine refrig here), I decided it was time to cut the cord, un-plug and "go green" with our wine storage. I decided to turn this cluttered, under-used cabinet in my dining room into my new wine storage spot.
I purchased 2 of these wine storage racks from Target, and erected them inside the cabinet, and voila, instant wine cellar!
Also in this picture is a new piece of pottery art, a porcelain chain link, that I bought from etsy artist Megan Bogonovich.

Friday, June 25, 2010

#201...behind the kitchen door

While waiting on some items to arrive for my kitchen banquette corner renovation, I turned my attention to other parts of the kitchen......like the messy, underused small space behind my back kitchen door. I mostly use the space as a place to hold recycling items that need to go out to the garage to be sorted. I gave the area a small makeover, starting with this mini-drawer tole painted shelf, that looks like something my Mom would have bought at a New England craft fair in the 1980's. It may have held index recipe cards, as that is about the size of the drawers.

Believe it or not, I actually paid $10 for for this baby at the thrift shop, but it was exactly the size I needed to help prop up my bust planter that stands in that corner....and I really like the white little porcelain knobs. Here is the after, with a black paint face-lift........

I used 3 of these Chilewich vinyl placemats in lime green that I got on clearance at Sur la table to create a curtain like drape for hiding the items inside the open front shelf cabinet. I also made a small tag for my metal recycling bin using scrapbook sticker letters from Target, a piece of basketweave hand-made paper, and an old-fashioned metal bin label. I added some scraps from my Japanese vinyl collection to the bottom of the recycling bin to help catch any liquid drops.

Wednesday, June 23, 2010

#200...new life for louis

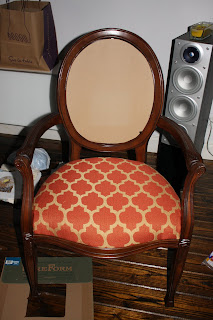
before
My client Erin had this Louis style armchair pushed against a wall in her living room. In rearranging furniture in the room, this chair got a more prominent spot in front of a large window, and Erin wanted to give the chair more color and more of a solid presence in her room. We got a yard of this fabric from Calico Corners and I went to work recovering the seat and building a solid back for the top portion of the chair. I simply used cardboard, batting, welting cord and hot glue to craft the chair's now solid backing, so Erin can remove the faux back down the road if she desires.

during

after

Monday, June 21, 2010

#199...summer swinging

In an effort to make house maintenance easier on myself, I decided to get rid of the old wood porch swing on my front porch that required yearly sanding and restaining, and replace it with a Poly lumber swing made of recycled plastics. Poly lumber is made from post-consumer bottle waste such as milk containers. Supposedly, Poly lumber requires no maintenance such as painting, scraping, or replacing. It is termite resistant and will not crack, splinter, warp or rot and does not promote bacterial growth or mildew and will not weather from natural elements. It is fade proof due to U/V stabilization.

I am pretty excited about my bright yellow swing that arrived last week!

Friday, June 18, 2010

#198...in lieu of plate ledge

I like to use these picture hanging rubber bumpers to help display plates inside cabinets that do not have a pre-routed plate ledge. It is a simpler solution and cleaner look than a bunch of plate stands. All you have to do is position your plate and stick a dot on the floor of the shelf to hold it in place. They are available at almost every hardware, home improvement & drug store in the picture hanging supply section.


My plate that I have displayed here is not really a functional plate. I bought the vintage paint by number United States cutout from something's hiding in here and decided to frame it by using artist's tape to adhere it to a thrift store platter. I think it helps make the little USA pop. It is displayed high up in one of my glass front kitchen cabinets.

Wednesday, June 16, 2010

#197...origami cranes


When I first saw the paper origami crane mobile by Cheri Messerli of Scout Holiday a few years ago on The Selby, I was in love with it. I even bought some hand folded paper cranes on ebay like these to make one of my own. Somehow the cranes got packed away, and I totally forgot about it, until I was reminded when design*sponge posted Cheri's new Paris apartment a few weeks ago. I dug out the cranes, and using fishing line and a square knot or two between each crane, I strung together long strands of the cranes and hung them from a hook that I put in my ceiling. I used about 80 cranes and took about 3 hours to complete the mobile. The biggest challenge was keeping them from getting tangled as I strung together the strands. Cheri sells her beautiful mobiles in her etsy shop here.

Monday, June 14, 2010

#196...nancy's plumbing pipe console

Remember when I posted instructions on how to make a side table from plumbing pipe? Well, I recently completed a larger plumbing pipe creation for my friend Nancy.
Her console table is about 70 inches wide by 30 high and 16 deep, and really makes the most of the space behind her sofa that is part of her dining room. She requested that I build the table to have a shelf in the middle for storage, which you can see that she is making good use of in the pic above of table sans skirt.

The plumbing pipe and wood materials for this table cost about $150. The 6 yards of fabric that I used to make the skirt cost another $100 and the glass piece for the top of the table cost $60 for a grand total of $310. It is a really large piece and completely customized to her space, and I don't believe we could have found a better alternative for the price.
In the background of this picture you can see the large entertainment unit that she had built. We painted it in Dove Wing by Benjamin Moore and added some seagrass wallpaper to the back panels. The ring pulls in pewter came from this online shop. We are finally ready to start the fun part......decorating it!
With the leftover scraps from the striped table skirt, I made her this round bolster pillow. We are still deciding on window treatments, but in the interim she is using paper Redi-shades, which look surprisingly nice for their low cost.

Wednesday, June 9, 2010

#195...firefighting goats

This post is completely off the "do-it-yourself" topic, but it is so entertaining to me that I thought I'd share.
In the quaint California town where my sister, brother-in-law and niece live, there are rolling hills of greenery, which are lush and pretty during rainy season, but a huge fire hazard during dry season. It is important for the town to keep the dried grass trimmed low to the ground to help prevent wild fires.

In lieu of using tractors to plow the hillsides, the town has employed a goat herder and  his flock to clear the land. As a city dweller, I thought it was quite a sight to see the goats moving across the hillside over the course of a week, plowing down everything in their path.
The herder uses the orange mesh fence to contain the herd into a specific area to be cleared. Using the assistance of a border collie, he moved the fences and goats to a new section every 12 hours or so. When I first saw them, I thought it would be a very slow process having them eat the grass down in sections, but it was amazing how quickly they ate and moved on.
audrey & me

Monday, June 7, 2010

#194....a rainbow of books

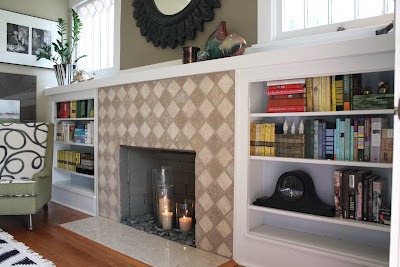
I found the above bookcase photo on Cookiemag.com and decided to give the rainbow book arrangement a whirl in the bookshelves that flank my fireplace.
My yellow Nancy Drew's seem to dominate, but overall I like the colorful effect. Since the shelves are narrow, I was limited to using mostly small fiction books, of which I don't have that many. I supplemented the rainbow book display with my small collection of vintage brass animals and mini bottle neck vases and my mantel clock that I made over here.

Friday, June 4, 2010

#193...stenciled side table

I picked up this little round wood table at the thrift shop for $14
It fit perfectly in my client Sara's family room as a small side table between her couch and club chairs, so I painted it for her using oil enamels and a stencil I made from this Anna Maria Horner fabric

Here are some pillows that I made for Sara with the same fabric. Next up for Sara's family room I'm going to refinish a vintage oval wood coffee table using the indigo, blue and gold colors in chalkboard paint!

Wednesday, June 2, 2010

#192....pants turned purse

I cut up these leather pants from the Gap circa 2000 to make the handles and bottom of this tote bag for a client who gave it as a gift to an expecting friend.

Tuesday, June 1, 2010

#191...magnetic paint

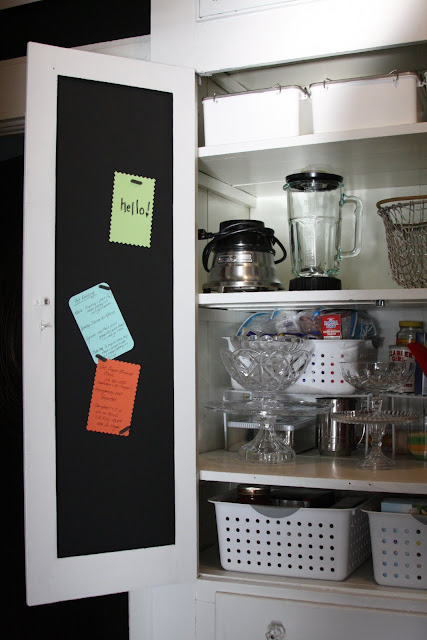
Now that I have returned home from my trips east and west, it is time for me to get serious about finishing my kitchen. In order to begin the process, I needed to do a little cabinet and pantry re-organization. I have an original built-in cabinet in the hallway off my kitchen that had become cluttered. In this picture you can see touch-up car paint beside  Ritz Crackers beside fishing line.............this lack of order made it hard to find anything.
In addition to organizing this cabinet to house my baking goods, small appliances and glass bowls, I decided to make use of the inside of the cabinet doors and turn them into magnetic boards, where I could put up recipes, invitations, my pet feeding instructions....etc. I painted the inside of the doors using this magnetic paint by Rustoleum.
The magnetic primer comes in a black color, and the box advises putting 2-3 thin coats on your desired surface, and then covering with a latex paint if you want it to be a color other than black.
I have put about 5 coats of the magnetic primer on the inside of my doors thus far, and I am really disappointed in the magnetic strength of the paint. It is a very weak magnetic board and it is currently taking two magnets to hold up a small piece of paper. I had hopes of painting the magnetic boards a light blue color, but I cannot imagine putting latex paint over the magnet primer, as I think it would further weaken the hold. I am going to continue to layer a few more coats of the magnetic primer, hoping to increase the magnetism and make the boards functional, but currently I have to say I am very unimpressed with this product.