I was in Ikea the other day as they were setting out their outdoor offerings for spring. I stumbled across the Svinga swing, and awkwardly battled getting two into my car to bring home. We were not in the market for giant swings, but they fill a corner of our deck, and they are really comfortable.
Tuesday, February 26, 2013
Friday, February 22, 2013
#581...birch log lamp
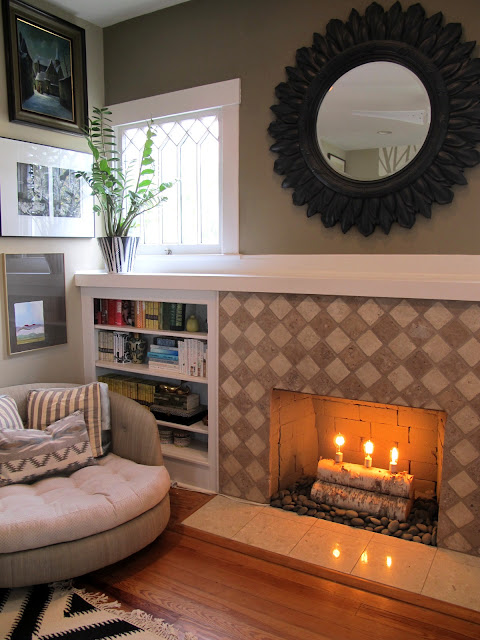
Our fireplace is not functional. There are some issues with our 1919 chimney that renders it unsafe for real fire. It would be an expensive venture to get the fireplace in operational order, and since we live in Houston and need a fireplace.....well, never.....it's just going to remain a decorative element in our bungalow. Over the holidays, I had some balls of Christmas lights inside the fireplace and they gave nice effect to the empty fireplace. I wanted something more permanent that added light to the fireplace, so Tyler built a birch log lamp to sit inside it.
Instead of finding our own wood for the fireplace lamp, we cheated and bought these birch logs from Minnesota on etsy.
First, Tyler drilled three evenly spaced holes through one of the logs
Next he bought some lamp kits and supplies
He wired up three individual light sockets and then dropped the wires through the holes in the log. He wired the three socket wires together creating one lamp cord on the underside of the log.
We got some Edison bulbs from Amazon, and hid the lamp wiring under the logs and rocks. There is an extension cord that runs to a nearby wall outlet. We put the log lamp on a timer so that it comes on for a few hours each evening. I still need to better disguise the extension cord running out of the fireplace to the wall plug.
Tuesday, February 19, 2013
#580...scrap plywood outdoor art
Last weekend, Tyler and I made a big art piece to hang on the back our our house out of scrap plywood. We had all of the rectangle and square pieces leftover from projects we have done in the past.
To begin, I used painter's tape and taped off some geometric designs on the plywood pieces.
I opened all of my quarts of oil paints (also from previous projects), and decided on a palette.
I used a foam sponge brush (one for each color) and applied the paint.
While the paint was still wet I ripped the painter's tape off to reveal the bare wood sections.
Tyler sanded all the pieces to give them a distressed look, and screwed them together using stainless steel nails (which hopefully will not rust)
He then screwed it into the house securely (we've had artwork blow off the back of the house before, during a storm, but this thing is not going anywhere.)
I still need to put some sort of sealer on the plywood to help it weather well.
Friday, February 15, 2013
#579...turquoise mirror makeover
This week, I transformed a dark metal mirror with three shades of turquoise paint for my client Janelle.
To paint the mirror I used a small brush and a sea sponge. I first put on a muted blue color, followed by a whitish turquoise, and then finally a greenish turquoise. The mirror has a bit of a distressed look to it, which is a hard to see in the photos, because it is subtle. The mirror is going to hang in a powder bath, atop a chocolate brown colored wall.
Labels:
painting
Wednesday, February 13, 2013
#578...my studio
It has been almost 5 years since I photographed my loft for this Design*Sponge peek. I've never really taken full angle shots of my studio space, located in the loft. Since my studio is currently the cleanest it has been in a few years, I thought it good opportunity to document it. I'm pretty proud of myself that not much as changed in my studio decor-wise in the past 5 years, and I still aesthetically love it.
Labels:
about me,
decorating
Monday, February 11, 2013
#577...mantelscape
My friend Sol asked me to come over and help her accessorize her mantel. She has a graphic mantel, with white painted brick and wood, and a really pretty vintage mirror of which she painted the frame in satin black.
In my opinion, mantelscapes are something you can easily change out on a whim. Sometimes I clutter mine up with accessories, and other times I wipe it clean, and just leave a lone candle. You can add-in seasonal decor, or use it to highlight new acquisitions, or framed kid artwork when you are in the mood to look at something different. I don't get too hung up about what is on my mantel. It is not like searching for a perfect piece of art to fit a spot that will stay there long term. Mantels are a good place to have fun decorating and re-decorating. Here is a progression of a few of the ways I styled Sol's mantel, using things she had around her house.
1. A drawing that her 23 month daughter did, some glass candlesticks, faux succulents, iron pig and vintage turquoise artwork that she inherited from her Dad
2. Added a giant gourd, removed the pig and vintage art
3. Brought the iron pig back, added a giant art photograph, removed the kid drawing and one succulent
4.Added a vintage crewel piece and changed orientation of her daughter's drawing
5. Added a book stack and a brass pig
6. Thought it looked too busy, so cleared it off a bit
7. Added some freshly cut palm fronds, removed the small succulent and Voila!...this was how it looked when I left it. It could look totally different today, as Sol had lots of great accessorizing options.
Labels:
decorating
Friday, February 8, 2013
#576...basketball at the office
Tyler wanted a basketball goal for his office, but could not mount one to the wall, or hang one over the door, so he built himself a table-top goal. He ordered this door/wall mount backboard from Amazon.
He built a frame to hold the backboard from scrap wood, and found a flowerpot to use as a base. Then he mounted his backboard to the frame.
He filled the flower pot in with dry cement,
...and wet it down to cement the goal in.
I painted the flower pot base black for him with spray paint,
...and we moved it to its new home atop his file cabinet at the office.
Labels:
ideas
Subscribe to:
Comments (Atom)


