My kitchen is featured in the summer edition of Better Homes and Gardens Special Interest Magazine kitchen + bath makeovers! It was shot over 2 years ago here, and I am super excited that it finally made it into an issue. I think my kitchen really fits the "color" theme of the summer issue despite my black walls. Yay me! I scanned it for those of you who won't get to see the magazine in person. I picked up an issue at Lowe's, but could not find it at Home Depot, so I think it is a little bit hard to come across.
Tuesday, May 28, 2013
Tuesday, May 21, 2013
#616...kantha scrap pillow
I was in West Elm a few weeks ago and came across a bunch of Kantha pillow covers in their clearance bin for $7. The Kantha pillow covers were made from recycled embroidered sari fabric from India. I love the story and re-use of the Kantha fabrics. (Last Christmas I gave a few Kantha throw quilts as gifts from Connected Goods.)
I bought the above Kantha pillow covers from West Elm and decided to make them into one larger lumbar pillow cover for my bed. I took apart the covers with my trusty seam ripper and pieced them back together to create this lumbar cover.
On the back, I simply did an envelope style closure that you can see above. I still have a bunch of scraps of Kantha fabric leftover to make some more Kantha creations.
Labels:
sew this
Wednesday, May 15, 2013
#615...hanging a rug on the wall
We spent last weekend in California visiting family and friends. While there, I helped hang a carpet on the wall in my sister's home office. My brother-in-law inherited the rug from his parents, who got the hand-made Navajo rug while living on an Indian reservation in Arizona during the late 1970's working as missionaries. The rug is special to my brother-in-law as he has fond elementary school memories on the reservation.
We hung the 4ft x 5ft rug using 3M command strips. I put about 12 or so on the back of the rug near the top. It seems like it is going to hold, but we'll see as it almost seemed too easy. This office is the same room that houses the big cactus painting I did for them a few years ago.
Also while in California, we spent an afternoon at Half Moon Bay...
(find Tyler)
....and Audrey and I practiced taking some self portraits
Labels:
about me
Thursday, May 9, 2013
#614...tessa's leaf collage
My tiny client Tessa, who was born today, is coming home to a really cool art piece that I made for her nursery. Tessa's Mom Laura commissioned me to create a collage painting similar to this Land of Nod piece, but on a larger scale. Here's how I made it.....
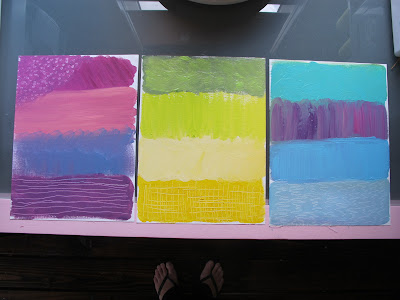
Using a few sheets from my canvas pad, I painted some solid and variegated colors using acrylic paints.
I used the back of my brush to scratch some patterns in a few of the colors.
Next, I cut out some cardboard patterns of the elliptical leaf shape, and figured out the appropriate size for my canvas.
I traced and cut the leaf shapes out of my dried painted canvas sheets.
I also cut some leaves out of patterned papers that I had on hand. Then I laid them out on the canvas and began gluing them down using Modge Podge.
Above you see the glue being painted on the back side of each leaf. Once all the leaves were glued down, I coated the entire canvas with about 7 thin coats of matte Modge Podge.
Tuesday, May 7, 2013
#613...bookcase styling
While at Corey's house last week, I did a little bookcase styling for her. She has built-ins in her living room with some very small cubbies. I picked up some thrifted pottery pieces, and some knick-knacks from HomeGoods and spruced up her shelves. Since the shelves are painted in a taupe color, I wanted to bring some lightness to them in the form of some white pieces.
Labels:
decorating
Friday, May 3, 2013
#612...plate gallery
I helped my client Corey with some decorating at her house this week. We hung a grouping of plates on a blank wall in her breakfast nook. To start, I arranged the plates that Corey had selected at Anthropologie. I brought a handful of vintage and resale plates to add in to the grouping if needed. We ended up using three non-Anthropologie plates.
First, I laid out the grouping on her table.
Next, I found the center of the arrangement and the center of the wall and figured out which plate to hang first. I find it really helps to take a picture of the plates laid out, as when you start to hang them you quickly forget how they were arranged. I had to refer back to the above shot of the plates on the table between each plate.
To hang the plates I used industrial strength velcro....but not really in the way it is intended. I cut about a 5 inch piece of the velcro. You can use either the male or female side, it does not matter.
I peeled back about 3 inches of the backing paper and cut and removed it from the strip. The exposed section you see below is the sticky side.
I stuck the sticky side to the plate back, keeping the top 2 inches as a tab. I then cut a small slit in the top tab portion of the velcro. I indicated my slit with black marker in the photo below. I put a nail in the wall and then hang the slit onto the nail, creating an invisible plate hanger. I have tried several methods of hanging plates, and this method seems to work the best for me, as long as the plates weigh 3 pounds or less.
Labels:
how to
Wednesday, May 1, 2013
#611...nori burrito
I like nori, but Tyler does not. We've had an uneaten package in our pantry for awhile, as it is hard to find ways to incorporate it into meals without him noticing. This nori veggie wrap recipe by Sarah Yates is the perfect single serving way for me to enjoy nori when Tyler's not around. I've made it a couple times for lunch, and Sarah's animated loop of building the burrito made it super easy to see how she wrapped it up.
INGREDIENTS:
hummus (I used Trader Joe's spicy hummus)
1 carrot, peeled with a vegetable peeler into strands
leafy greens (spinach, baby kale, arugula all work great)
1/2 avocado
nori sheet (I toast my Nori sheet gently over an open flame for a few minutes)
siracha
Labels:
cooking
Subscribe to:
Comments (Atom)


.jpg)


