Friday, June 29, 2012

#502...sweatshirt snake

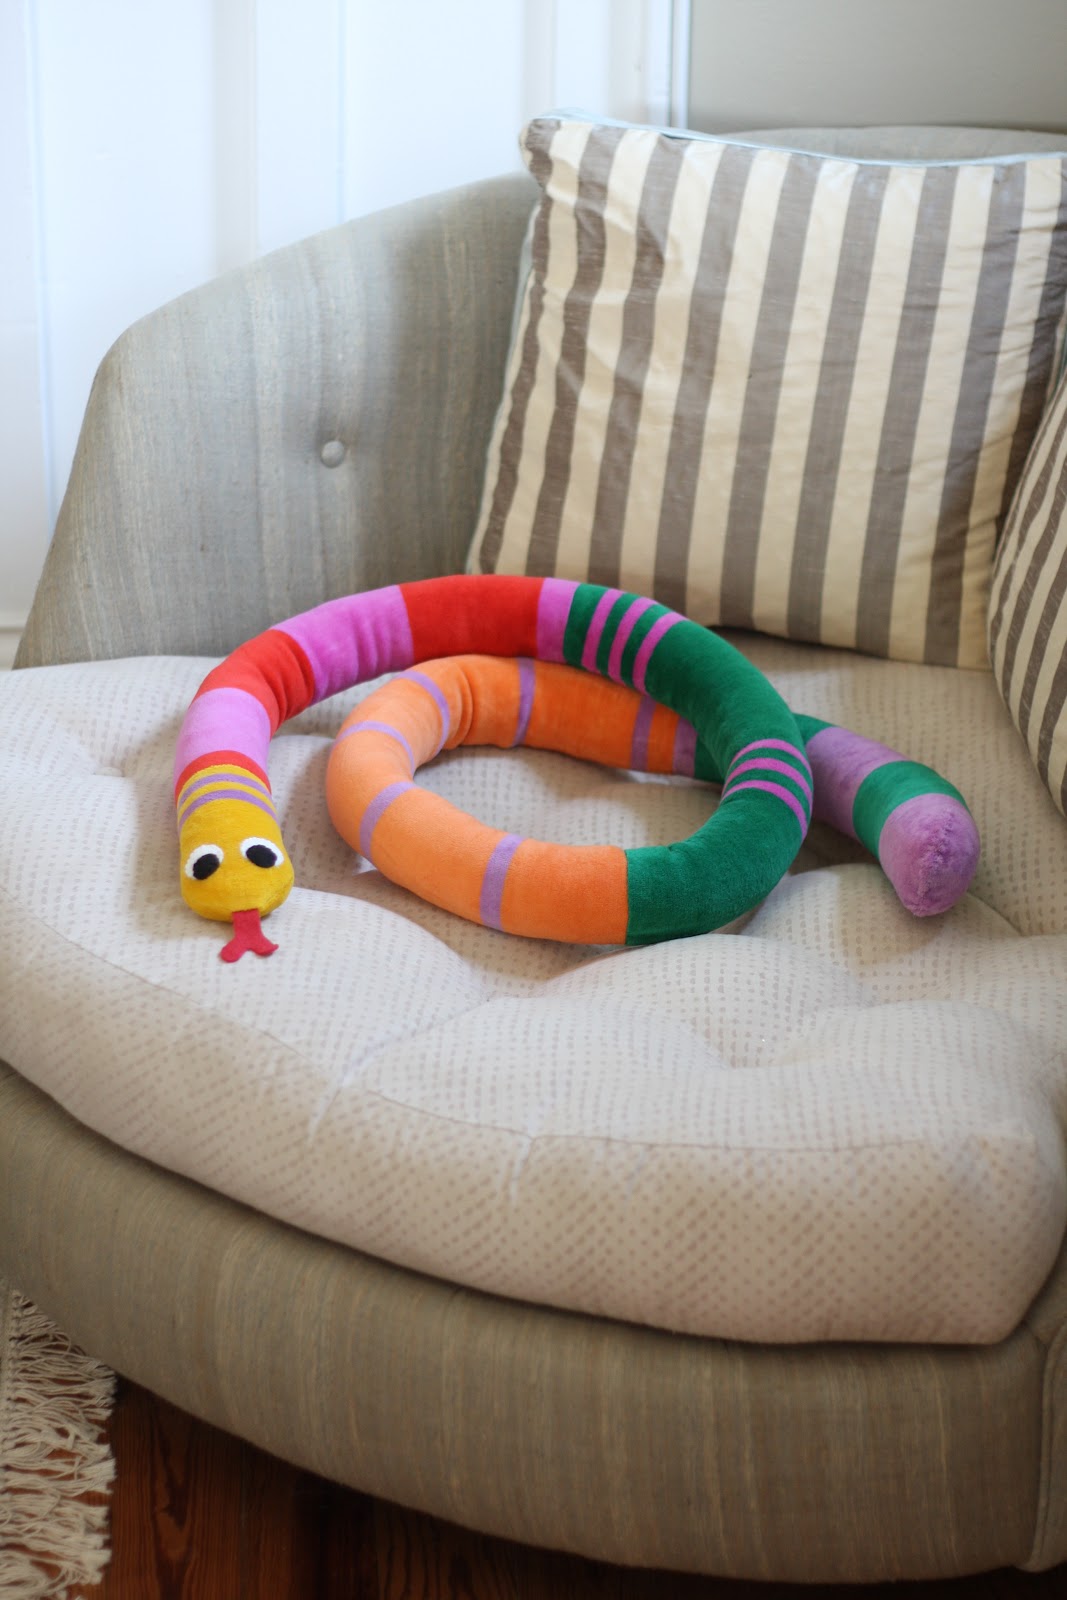
I got this vintage 80's velour sweatshirt a couple years ago. 
It was in mint condition, since it looks like the type of thing you buy, wear once, and then wonder "what was I thinking". Anyway, it was really soft, and at the time I picked it up, I'm sure I had some great idea of something to do with it, but I can not remember what I was thinking I'd do with it. I recently came across it (in the attic) and thought of the perfect thing to turn it into......

.....a large stuffed snake.
I modeled my snake after Mr. Snake by ferm Living. I started by cutting the sweatshirt into rectangles that I stitched together to make the snake tube body.
This 6 ft. snake is on his way to live in NYC with my little cousin Samuel, who recently got a new little sister, and may need a snake to help him better terrorize his new sis.

Wednesday, June 27, 2012

#501...attic conversion

I'm daydreaming about how I could turn this similarly shaped corner of my attic

into this cozy space
(This picture comes from a really great portfolio)

Monday, June 25, 2012

#500...my newly recovered settee

I got this little settee a couple weeks ago.
I have a bit of an upholstery shop addiction, so I rushed my settee right over there.
I love to see the transformation, and I am happy not to do it myself. Upholstery is a skill I really admire. I've attempted it many times, and it's complicated, hard work. My settee came back finished on Friday.
I opted to have the cushion done in a different fabric to give the settee some personality. I'm currently floating my cloud cushions on it.

Friday, June 22, 2012

#499...malm console and lumbar pillow

I am working on some ideas for a client who has the Malm bed frame from Ikea, and I realized that I have never posted about the Malm modification I made to my bed. 
I've had my Malm nearly 9 years. I have the birch color, (which I don't see listed on Ikea's website anymore). For the first two years we had it, the headboard was pushed up against the windows. I always thought it would be nice to have a ledge at headboard level to set things on. We pulled the bed away from the window about a foot, and Tyler built a wood top console with wood legs that fit behind the Malm. 
Here are some side angle views of the console. It is open underneath. It does have some middle support legs to keep it from sagging. I painted the top of the console in the same white as my window trim, so it really does not stick out in the room.

Over the years, I have changed my bed pillows several times, but I always stick with white quilts on my bed, as my room is somewhat small, and a big pattern on the bed makes it seem smaller. I have to cover my pillows with a coverlet every day, due to the fact that my cat spends 90% of his time sitting at the head of my bed.....and I am allergic to him. 
After schlepping decorative pillows and cat coverlets on and off my bed for years, I decided to minimize my throw pillows and shams and just do one single lumbar style decorative pillow. I thought about using a feather insert, but after ordering one and realizing how heavy it is, I opted for this synthetic body pillow as my insert. It is super light-weight, and I can easily toss it to the floor when I am ready to climb into bed.
The pillow insert is 20x54, but the pillow cover that I made is proportionately smaller to keep the pillow looking nice and stuffed. The finished pillow cover is 17x39.

Wednesday, June 20, 2012

#498...eboards of late

Here are some virtual room design boards that I've worked on lately.........


master bedroom


boy's nursery


playroom


dining room


master bedroom


entry foyer


teenage girl's room


master bedroom suite


family room


entry living room


family room

Monday, June 18, 2012

#497...maxi-dress makeover

I bought this Corey Lynn Calter dress at Anthropologie a few seasons ago. I loved the print, but the style of the dress never really worked for me. It was an ambitious purchase with the plunging neckline. It's was way out of my comfort zone, and sadly it never got worn.
I pulled it out of my closet to sell it, and remembered how much I loved the print, so I decided to use the fabric to make myself a Wikstenmade tank from a pattern that I first used here. Here is my new tank.


The dress also yielded enough fabric to make two silk infinity scarves. I am totally obsessed with silk loop scarves this summer. I figured out how to make them a few weeks ago, and I've been whipping them up and wearing them like necklaces over T-shirts. I'm keeping one from this dress print, and I put one up for sale in my Etsy shop here. It has been ages since I put anything handmade up for sale on Etsy, and I'd forgotten how fun it is to list my wares up for sale. I hope to put some more silk infinity scarves up soon!

Friday, June 15, 2012

#496...scott's guest room

A few months ago, I created this design board for my client Scott's guest room. The bottom portion of the board shows some inspiration rooms, and the top portion actual products for his room.

Scott purchased all of the items on the board and here is his finished guest room

In addition to the items on the board, he also added a reclaimed wood bench with hairpin legs purchased on Etsy. Above the bench, I painted a re-creation of a lulie wallace painting for the room. The painting is done in acrylics on a gallery wrap canvas sized 24 x 30. Here are some shots of the painting in progress.....


...and here is the finished painting

Wednesday, June 13, 2012

#495...yarn bombing

My friends were just telling me about International Yarn Bombing Day, (I'd never heard of it) and as I turned the corner on my street this morning, I noticed this big yarn bomb installed along the Hike and Bike trail in my neighborhood!


Monday, June 11, 2012

#494...sweater deer head

I came across this antler mount at a thrift store and thought I could turn it into a cute wall deer for my friend Nancy's nursery.
I used a sweater, a scrap of plaid wool, some leftover wool/cashmere yarn and some fiberfill stuffing. Here is my finished stuffed animal deer. 
Here's how I crafted him......
I started with this felted wool sweater of mine that made it into the dryer and shrunk to fit a small child. The process of washing and drying wool, felts the wool, making the weave tighter and the fabric more "felt-like."
I cut the sweater into the various face patches I wanted for the deer and started hand sewing them onto the mount.
I built the nose-area up using sweater and some fiberfill stuffing to give the deer a profile.
Once the face and nose are were completed, I added his eyes and black nose. I used my machine to make the plaid ears, and then embellished them with sweater scraps. Here is another "during pic" while I was working on the face. On the left, you can see the inspiration pic I pulled from Etsy of a small felted deer lapel pin.
Deer left for his new home yesterday. I'm excited to visit him when his new little owner arrives in a few weeks.