I had the cushions made at a local upholstery shop, and while it was not an inexpensive endeavor, it was much less costly than buying two new couches. I decided to have the cushions made so that they could be reversible, offering a variety of looks for the couch. I am really pleased with how they turned out, and how much they changed the look of my room.
Wednesday, March 31, 2010
#164...new sofa cushions
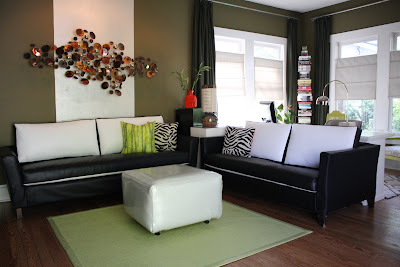
My couches have been looking a little sad lately. The cushions, which I covered myself 7 years ago, really needed a facelift. Additionally, each couch had a bunch of loose cushions across the back, which always end up on the floor, and constantly needed arranging. I decided to have new cushions made for my couches. My couches are covered in marine grade textured pleather (vinyl) and have held up really well for the people and pets that use them; so I went with the same fabric for the new cushions, but decided to go for a cleaner, more modern look, opting for much fewer cushions. Also.....I decided to use a professional and not try to make them myself.
I had the cushions made at a local upholstery shop, and while it was not an inexpensive endeavor, it was much less costly than buying two new couches. I decided to have the cushions made so that they could be reversible, offering a variety of looks for the couch. I am really pleased with how they turned out, and how much they changed the look of my room.
I had the cushions made at a local upholstery shop, and while it was not an inexpensive endeavor, it was much less costly than buying two new couches. I decided to have the cushions made so that they could be reversible, offering a variety of looks for the couch. I am really pleased with how they turned out, and how much they changed the look of my room.
Labels:
ideas
Monday, March 29, 2010
#163...houseplant success
I really like houseplants, but I have not had that much success keeping them alive, until I came across Zamioculcas. I have three of them growing very nicely, and they have been so easy to care for. The plant tag even says "wants minimal attention"......it does not get much easier than that. I bought one of the plants at Ikea and the other two at Home Depot.
Labels:
gardening
Friday, March 26, 2010
#162...flowers for my kitchen
Inspired by this photo from the mother/daughter design blog good bones, great pieces of a room done by Marc Blackwell for Diffa Dining by Design in New York..........
I ordered this cotton rug from Urban Outfitters for my black galley kitchen
The pattern is not nearly as large of a repeat as I was hoping for, but the price is great for the size, and I'll keep it for summer or until my dogs manage to ruin it.
Labels:
splurge
Thursday, March 25, 2010
#161...pelmet vs. cornice
My client Hilary asked me what the difference between a pelmet and a cornice is. I had no idea, so I consulted Webster, and basically a pelmet is a type of cornice.
Cornice:
1 : the molded and projecting horizontal member that crowns an architectural composition
2 : a decorative band of metal or wood used to conceal curtain fixtures
Pelmet:
1: a short valance or small cornice for concealing curtain fixtures
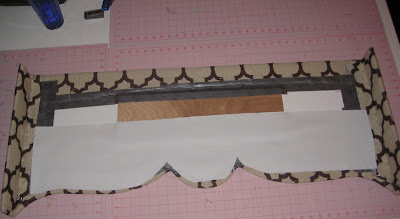
I made the above pelmet for Hilary, following the great tutorial from Jenny of Little Green Notebook . This is the second pelmet that I've made following her instructions, (see my first one here), and have a few pointers of my own about crafting the pelmets.
First, instead of using a box cutter to cut the foam core, I used an Exacto-knife. I found that the box cutter kind of chewed up the foam core leaving the edges jaggedy, while the Exacto blade cut a smooth curve. This may also be because my box cutter blade is not changeable, while I used a brand new Exacto blade.
Second, when wrapping the pelmet with fabric and batting, I have not had much luck getting the fabric to tightly hold onto the foam core with only a staple gun. I have resorted to a combination of hot glue, staples and duct tape, as you can see here. You can also see that I added a thin piece of wood to the back of it, just for extra support and to help keep it firm.
My final tip is that I realized while making Hilary's pelmet that the back side of it could show from the outside of the window, depending on how you place the pelmet. I decided to use a scrap of white canvas and cover the lower half of the back of the pelmet so that from the outside of her window you don't see the duct tape, wood, staple, hot glue mess.
Wednesday, March 24, 2010
#160...pillow welting
Admittedly, I am not good at adding welting (or piping as you may call it) to pillows. Sometimes it comes out great, and other times the corners are terrible, the stitching is wavy causing the welting to be loose in some places....making the pillow altogether not good.
I wanted to become a better welter (is that a word?).....so I consulted Matthew Haly's book of Upholstery, which was very helpful on the topic. Haly shows how to successfully make your own welting, how to sew it in, and gives helpful tips on clipping the corners and using the proper machine foot. While working through his steps to make a welted pillow, I learned something about pillow making that I had never read before. He suggests that to make a nicely stuffed square pillow, you actually use a curved pattern like this.....
I tried his pattern making technique and my pillows are coming out much better. Above and below are some welted pillows I've made, and I am pleased with how professional they turned out, thanks to Haly's book.
Labels:
book review,
sew this
Monday, March 22, 2010
#159...3D fabric letters
My client Kresta had some leftover fabric from her nursery bedding, and I thought I could make her a custom 3D decorative fabric letter for her baby's room from the scraps, inspired by these letters from Anthropologie. Here is how I made the above letter "G."
First, I chose the sans serif font Arial and printed it in 10% gray scale. I played around with enlarging it, and when it got too big for my printer, I cut up pieces of the enlargement and transferred it onto poster board with the help of my French curve ruler. Below is my posterboard pattern.
First, I chose the sans serif font Arial and printed it in 10% gray scale. I played around with enlarging it, and when it got too big for my printer, I cut up pieces of the enlargement and transferred it onto poster board with the help of my French curve ruler. Below is my posterboard pattern.
Next, I traced and cut two letter faces out of mat board (I used scraps of black and white) and I cut up a cereal box into 2" strips for the sides of the letter.
Using my hot glue gun, I began gluing the side strips to the back "G." I added tape to the corners and inside walls just for extra support.
I added batting to the front "G", making sure to glue the batting to the right side of the letter.
I trimmed the batting to the edge of the letter and began wrapping it with the fabric, using hot glue and tape to hold the fabric taut. For curved edges you have to clip the fabric every inch or so, to insure that the front of the letter stays smooth and taut.
I similarly wrapped the bottom "G", however instead of gluing to the back of the letter; the raw edges of fabric got glued up onto the sides.
This picture shows the front "G", back "G' and the fabric strip I made to cover the sides. For the sides, I cut a piece of fabric 3" wide and turned under 1/2 " on each, slipped some batting into the turned over edges for a more padded look, and machine sewed down the two sides of the long strip.
Above you can see me gluing the side fabric strip onto the sides.
The final step was to place the front "G" onto the base. I used a little hot glue to hold it in place, and then I used a curved needle to hand sew around the entire letter. This letter took me about 3 hours to make. Overall, it was easy and fun to create. There is a lot of measuring, cutting, gluing and you have to take your time and go slow because of the curves and small spaces on the interior of the letter.
Labels:
how to
Friday, March 19, 2010
#158...see my shells
There was not a lot of souvenir shopping opportunity on my sailing trip, so I picked up some beach shells to bring home and display. Above are tiny, tiny bits of shells and beach glass (the whole collection looks small in the palm of my hand.) I think I will put them in some sort of shadow box, as I like the rainbow effect. My other shells include small pieces of various coral that had washed ashore and a few pretty shells. Thanks for enduring my vacation photos this week; I'll be back to reality next week.
Labels:
travel
Wednesday, March 17, 2010
#157...abstract photography
I really love the framed photo of water in the room above. It has such an abstract, graphic quality about it, and I like how unexpected and modern it looks with the traditional elements of the room.
While on vacation, I tried to take a few abstract photos to capture the color palette of the Caribbean. It was harder than I thought it would be to properly focus my camera and catch shots of the water rushing by. I think I need another trip to practice some more! Here are the best of what I took.
ocean
picnic table
ocean
ocean
beach
ocean
ocean
ocean
On a side note, I like this site of abstract photography in a bright palette, which would be fun to hang together as a grouping.
Labels:
photography
Monday, March 15, 2010
#156...denim vacation tote
built by wendy
my denim tote
To make the tote, I used 4 pair of old jeans in varying colors of denim.
I cut 6 inch wide strips from the legs of the jeans. (The 8 legs yielded enough strips of denim to make 2 totes)
I cut 6 inch wide strips from the legs of the jeans. (The 8 legs yielded enough strips of denim to make 2 totes)
I sewed the strips of denim together, cut out my tote bag pattern, and sewed the bag together.
I lined the bag with a yellow cotton toille, added denim handles and a magnetic snap for closure. It took me about 2 hours to make this tote.
Here are a few more pics from the B.V. I.'s.........................
my sister Julie at the Helm
Tyler winding the wench in the rain
the dinghy behind the catamaran
heating up the grill
Subscribe to:
Comments (Atom)


.JPG)


